Revin din nou dupa o
lunga pauza in care au avut loc multe schimbari in viata mea. Trec si acum
printr-o perioada extrem de aglomerata
dar imi este atat de dor de micul meu blog…
Va arat astazi o
manichiura facuta toamna trecuta, cand inca erau inflorite muscatele mamei,
dupa cum puteti vedea in poze :)
E o manichiura simpla
dar totusi eleganta, pentru ca french-ul va fi mereu simbolul elegantei si al
feminitatii, zic eu.
Va las cu pozele, sper
sa va placa.
Ce
parere aveti? Purtati des manichiura frantuzeasca? Va doresc o zi superba!
Astazi
vreau sa va arat manichiura pe care am purtat-o de Pasti. Nu e vorba de o
manichiura tematica deoarece nu am avut timpul necesar sa ma gandesc la ceva,
tot lipsa timpului fiind si motivul pentru care nu am facut un tutorial (mi-am
facut unghiile sambata seara, inainte sa merg la slujba de Inviere).
Am
vrut totusi ceva elegant si ce poate fi
mai elegant decat un french? Iar pentru ca nu am vrut ca manichiura mea sa fie
prea monotona, pe unghiile de la degetele inelare am aplicat o superba oja de
la China Glaze, Spontaneous, si am
pictat floricele albe.
Sper
sa va placa si voua asa cum mi-a placut mie :)
Tema concursului era sa creem o manichiura folosind doar doua culori (de fapt non-culori): alb si negru.
Am ales sa fac un french pe care l-am accesorizat cu doua floricele alb cu negru pe degetul mare si pe inelar iar pe celelalte am facut punctulete negre pentru a le integra si pe ele in tema data.
Revin in atentia voastra cu o manichiura potrivita pentru iarna, chiar si pentru Craciun.
Am optat pentru un model "nins", un french realizat cu buretele iar unghiile de la degetele inelare le-am imbracat intr-o culoare potrivita sarbatorii ce se apropie cu pasi repezi, rosul. Am creat astfel o baza potrivita pentru simpaticul omulet de zapada care a fost deliciul colegelor mele de la munca saptamana aceasta.
Va rog sa scuzati lumina proasta din tutorial, mi-am facut manichiura la lumina veiozei intrucat, stiti si voi, ziua este al naibii de scurta :(
Va
arat abia azi o idee de manichiura pentru Craciun, dar mai bine mai tarziu
decat niciodata, mai ales ca acest model se potriveste iernii in general, nu
doar Craciunului.
Este
de vorba de acest simpatic om de zapada pe care eu l-am facut pe degetul
inelar, alaturi de un french nins pe celelalte degete. Nu am facut tutorial
pentru acest design pentru ca am preluat ideea de la Simply Rins care are deja
tutorialul postat pe youtube (eu din pacate nici nu as fi avut timp sa-l fac, mi-am
facut manichiura la lumina artificiala iar filmarea ar fi fost de calitate
proasta). Oricum, daca vreti sa-l reproduceti, aici aveti tutorialul lui SimplyRins:
Produsele
folosite de mine/ The products that I
used:
I am showing you,
a bit late, a Christmas manicure idea, but better late than never, especially
because this nail design fits winter in general, not just Christmas.
I am talking
about this cute snowman which I made on my ring finger, together with a snowed
french on the other nails. I didn’t make a tutorial for this design because I
took the idea from Simply Rins who already uploaded the tutorial on youtube
(unfortunately, I didn’t even have the time to make the tutorial because I made
the design in artificial light and the recording would’ve been really bad). Anyway,
if you want to reproduce it, you cand watch Simply Rins’ tutorial above.
Azi
am sa va arat o manichiura foarte simpatica si eleganta. Este usor de realizat
iar efectul, zic eu, este unul deosebit.
Este
vorba despre un french realizat din floricele preponderent albe. Pe degetul
inelar si pe cel mare am facut, in loc de floricica centrala alba, una mov. In poze
nu se vede prea bine ca e mov, dar este :)
Am
terminat manichiura cu un strat de top coat, et voila!
Vreau
sa mentionez ca modelul a fost inspirat de andayn, o bloggerita foarte
talentata in domeniul nail art-ului.
Today I am
showing you a very pretty and elegant manicure. It’s easy to do and I say the
effect it’s pretty special.
I am talking
about a french made of little flowers, mostly white. I replaced the white
flower with a purple one on the thumb and ring finger. I know in the pictures
it doesn’t look like purple, but it really is :)
I finished the
design with top coat and here it is!
I want to
mention that this design was inspired by andayn, a very talented nail art
blogger.
Just scroll down
for the pictures and the tutorial.
Astazi am sa va arat o manichiura simpla si eleganta, care mie imi place foarte mult.
Am trasat un french alb, clasic iar pe inelar si degetul mare am facut cate o floricica portocalie cu putin alb. Pentru a face legatura intre unghiile cu model si celelalte am adaugat cateva puncte portocalii pe unghiile fara floricele.
Today I am showing you a simple and elegant manicure, which I really like.
I made a white classic french and I painted orange flowers on the ring finger and thumb. To make the connection among the nails with the design and the other ones, I made some dots on the nails that don’t have flowers on them.
I am leaving you with the pictures and the video tutorial.
Astazi am sa va arat o manichiura pe care am avut-o acum cateva zile pe unghii (nu stiu cum se face ca tot raman in urma cu postarile), o manichiura vesela, de vara.
Pentru realizarea florilor de la aceasta manichiura am folosit culorile acrilice primite de pe bornprettystore.com, despre care v-am vorbitaici.
Today I am showing you a nail design that I had on my nails the other days (I don’t why I am always late with my blog posts), it’s a happy, summer nail design.
I used the acrylic paints I got from bornprettystore.com to make the flowers for this mani, I told you about them here.
Va prezint o manichiura eleganta, care are la baza French-ul. Am ales sa fac un French alb pe trei din cele cinci unghii de la fiecare mana, pe inelar si pe degetul mare optand pentru un French roz. Pe aceste doua unghii am facut si modelul, si anume cate o floricica 3D alba. De asemenea, dupa cum puteti vedea, French-ul e facut cu buretele. Aleg des aceasta metoda pentru French pentru ca mi se pare mult mai usor sa il fac asa decat din pensula si arata mai deosebit.
Pentru floricelele (sau alte modele) 3D aveti nevoie de pudra acrilica, lichid acrilic si pensule speciale pe care am sa vi le prezint in postarea urmatoare.
Va las cu poze si cu tutorialul video unde puteti vedea exact cum am facut totul :)
I am presenting you an elegant nail design based on French manicure. I chose to make white French on three of the five nails from every hand and pink French on the ring fingernail and on the thumb. Those two nails are those on which I made the design and that is the 3D white flowers. You can also notice that the French was made with the sponge. I choose this method pretty often because I think it’s easier to make French manicure this way then directly with the brush and it looks kind of special.
For the 3D flowers (or other 3D designs) you need acrylic powder, acrylic liquid and special brushes which I will show you in my next post.
I am leaving you with the pictures and the video tutorial where you can see exactly how I made this nail design :)
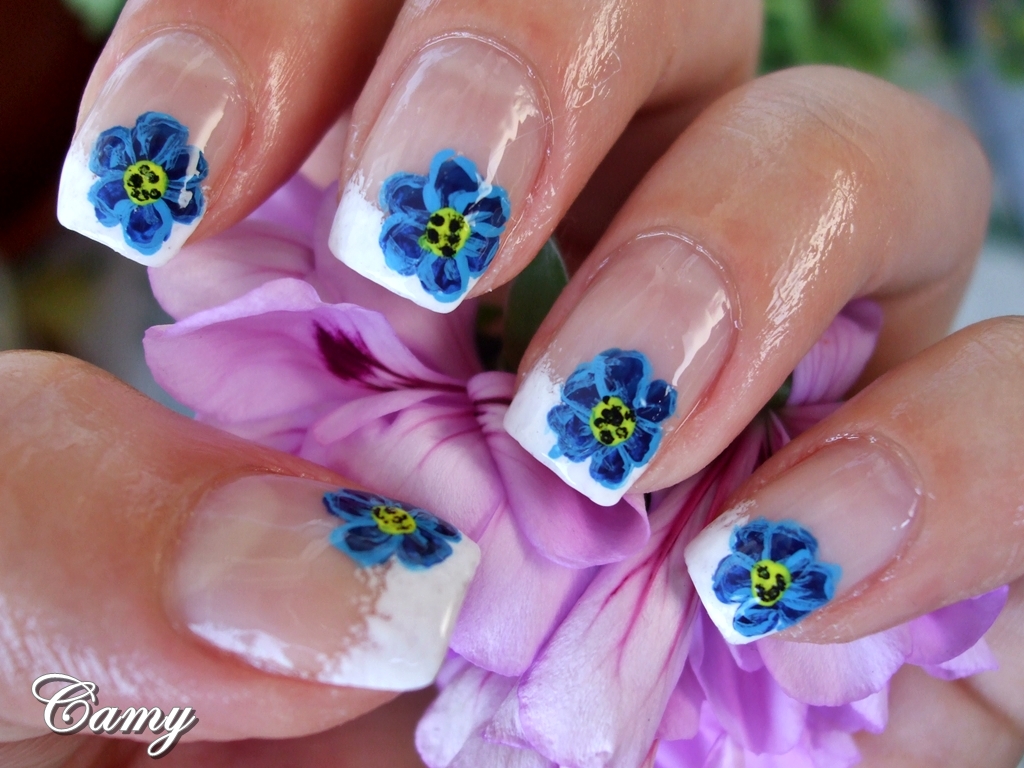
Modelul pe care vi-l arat azi tocmai l-am sters de pe unghii, dupa vreo saptamana de purtat. Mi-am dorit un model de vara, cat de cat elegant si sa aiba alte culori decat florile obisnuite (roz, rosu, alb, portocaliu si alte derivate). Si am ales albastrul dar nu mi-a parut rau deloc, imi place mult rezultatul (ce modesta sunt :)) ).
Modelul este acelasi pe toate unghiile, cate o floricica albastra conturata cu un albastru mai deschis, pe baza unui french facut cu buretelul.
Sper sa va placa si voua, este un model potrivit pentru zilele insorite de vara :)
Mai jos aveti si tutorialul video unde puteti vedea cum am facuta aceasta manichiura.
The design that I am showing you today was just removed from my nails after I worn it for about a week. I wanted a summer nail design, pretty elegant and with other colors than the regular flowers (pink, red, white, orange and other derivates). So I chose blue and I am not sorry at all, I really like the result (I am so modest :)) ).
I made the same design on each nail, a blue little flower outlined with a lighter blue, painted on a sponged french.
I hope you will like it too, it’s a nice nail design suitable for sunny summer days :)
In sfarsit am reusit sa-mi fac si eu manichiura, adica sa fac si un model pe unghiutele mele. In ultimul timp le-am purtat doar date cu oja din cauza lipsei de timp si a programului meu cu care inca nu m-am obisnuit.
Va prezint o manichiura vesela, colorata, perfecta pentru zilele insorite de primavara. Am facut cate o floricica pe fiecare unghie, avand ca baza o oja sclipicioasa si un french mov.
Finally, I made my manicure! I mean I finally made a design on my nails. In the last few weeks I just polished them, with no design, because of the lack of time and because I am not accustomed yet with my new schedule.
So, I am showing you a joyful, colorful manicure, perfect for these beautiful, sunny spring days. I made a little flower on each nail and I used a shimmery nail polish and purple french tips as base.